Dear Friends,
The intention of this blog was to follow my journey through learning how to cook while being a busy nursing student on a budget. I have been cooking away the past few weeks and learning new tricks and recipes. The problem is... I'm a busy nursing student.
But I haven't forgot about you guys!! It's just midterms time!
I have many recipes and blog posts lined up just ready for me to write about.
such as:
Easy Chicken Noodle soup
Superbowl Sunday Madness (buffalo chicken dip/guacamole/fries)
Best Chocolate Chip Cookies
Lasagna
Oreo Cheesecake
Banana Boats!
Peanut-Butter Chocolate No Bake cookies
Minty Moopies (Peppermint Patties)
Heart Shaped Peanut Butter Cups
Roasted Brussel Sprouts
BBQ Baked Chicken
Kale chips
Goodness... I didn't realize how long the list got... March 3-10 is SPRING BREAK!! I'm going to my Gramma's house at the beach so I'll have plenty of time to tackle this list. Can't wait to tell stories!
Gramma also told me I can't visit her unless I bake her cupcakes (pfft, makes me want to visit her more!). So in the spirit of beach and the new movie The Lorax, I'm making Truffula Tree cupcakes! They will be some sort of crazy color and flavor that I'm not quite sure of yet. So excited.
On another note, even though I haven't had time to blog about all my creations, I've certainly had time to cook/bake. Half of the stuff on the list isn't so good for you... but I've been eating very healthy despite my crazy schedule.
Don't think that just because you're busy you don't have time to eat healthily!
Happy Cooking!
Liz

Saturday, February 25, 2012
Friday, January 20, 2012
Homemade Hot Chocolate, Ice-cream float with Caramel Sauce

Oh man. Oh man oh man oh man. This is the greatest creation.
A couple nights ago, I came home and wanted something sweet and chocolatey. But we have no more chocolate chips in the apartment. My intention for food has been to cook with what I have and make it last for a whole month. So no chocolate chips means no baked goods with chocolate chips in them. Fine. I have Cocoa powder.
All the things I have made so far in my life and in this blog have been based on someone else's tested recipe. I wanted to be adventurous that night and how hard could it be to make Hot Chocolate from scratch?
I made Crock Pot Chocolate cake last Sunday and a portion of the recipe was a watery chocolate mixture to pour over the batter. But this liquid chocolate mixture tasted like Willie Wonka's waterfall. I remembered it had cocoa, sugar, and brown sugar. Cool. measurements?.... I'll figure it out
I started with 1/4 of a cup of each then boiled some water and poured it over the ingredients.... it made 4 big cups. just me in the house.. disaster. The first cup tasted amazing. Lizzie (roommate) thankful came to the kitchen and got a cup. The last cup of the batch I couldn't even drink because it was.. gritty.. and chunky. I left it on the table that night and in the morning it had solidified! whoops.
This recipe needs perfection. I invited my best friend and boyfriend over last night and we were going to make milkshakes and hot chocolate.
What actually happened was this:
Hot Chocolate-icecream float with Caramel Sauce
(this recipe makes 1 cup)
STEP ONE
HOT COCOA
1 Tbsp Cocoa
1 Tbsp Sugar
1 Tbsp Brown Sugar
1 Tbsp water
1 1/2 cup milk
Put cocoa, sugar, and brown sugar in mug. Stir in the 1 Tbsp water until it forms a dark chocolately mixture with a slight sheen (this is important so it doesn't form lumps like my first batch).
Heat milk on stove or in microwave, be sure not to scald it.
Stove: 5-8 minutes on medium high heat
Microwave: 1 minute 25 seconds on high
Pour milk over chocolate and stir until completely dissolved.
ICECREAM TOPPING
Since we were planning on making milkshakes with my roommates amazing malt machine, we got everything ready without considering the fact that we would end up with two drinks.. So how can we combine it? Make a chocolate milkshake? ...nah.. Hot chocolate float! yes!
So we had French Vanilla Ice-cream and milk in the malt machine (the things they have at fast food places to mix things in your shake and to make it super creamy) and all we did was make super creamy ice-cream. It was perfect to go on top of our hot chocolate. The contrast of hot and cold was perfect. Makes your mouth water.
If you don't have a malt machine.. just stir up the ice-cream with some milk to make it super creamy so you can whip it up on top. Easy..
CARAMEL SAUCE
This was a challenge. I've never made caramel before. And I suggest making this at the beginning. Before you heat your milk and stir your ice-cream. That's two elements you don't want to lose their temperature.
Ingredients:
IMPORTANT- have them next to the stove and ready. to. go. Candy making is no joke.
1 Cup sugar
6 Tbsp butter
1/2 cup Heavy Cream (I didn't have this because I can't go to the store until February, so I used ice-cream)
Put the sugar in a heavy sauce pan on Medium High heat.
This is a saucepan

Not this

I make this mistake too many times to count....
ANYWAY
Sugar is in the saucepan on the stove. You are whisking constantly because you have no idea what you are doing and you don't want to burn the sugar. It gets very hot very quick, do not touch it. it will not boil, that doesn't mean it's not scalding hot. You may already know this, but I didn't and it looks delicious in the pan. Thank goodness Andi was there to stop me.
When the sugar melts and takes on a light amber color, stop whisking and swirl it around a bit.
Add the butter and continue to whisk again.
As soon as the butter has melted, take it off the heat COUNT TO THREE and slowly add the heavy cream/ice-cream.
Keep off heat. whisk and it will start to thicken. It will thicken more and more as it cools.
YOU STILL SHOULDN'T TOUCH IT. it will look so yummy at this point, it's hard to resist... I surprised I still have fingerprints.
Let it cool for about 10-15 minutes then pour into a Mason Jar (or empty jelly jar. I love that we never throw those away)
NOW TO PUT IT ALL TOGETHER!!
Hot Cocoa- Hot and ready
Ice-cream- Cold and ready
Caramel- yes
I love life...
and chocolate.
and my friends.
Fries. Baked Fries.
(I was going to post this like 5 days ago, but I couldn't get the pictures to load until now..)
Lately I have been craving something fatty and salty and specifically French Fries. Don't ask why... I'm not entirely sure. But last week after work (I'm a nanny!) I drove by about 30 fast food places resisting the urge to stop. Then it finally hit me, I have a 5 pound bag of potatoes at home!
Side note: I went shopping with my roommate and we decided to split the potatoes.. which was a whopping $1.25 each. score.
I've made two types of fries. The French fries that you get from fast food and buffalo chips that you get from Buffalo Wild Wings. Both delicious.
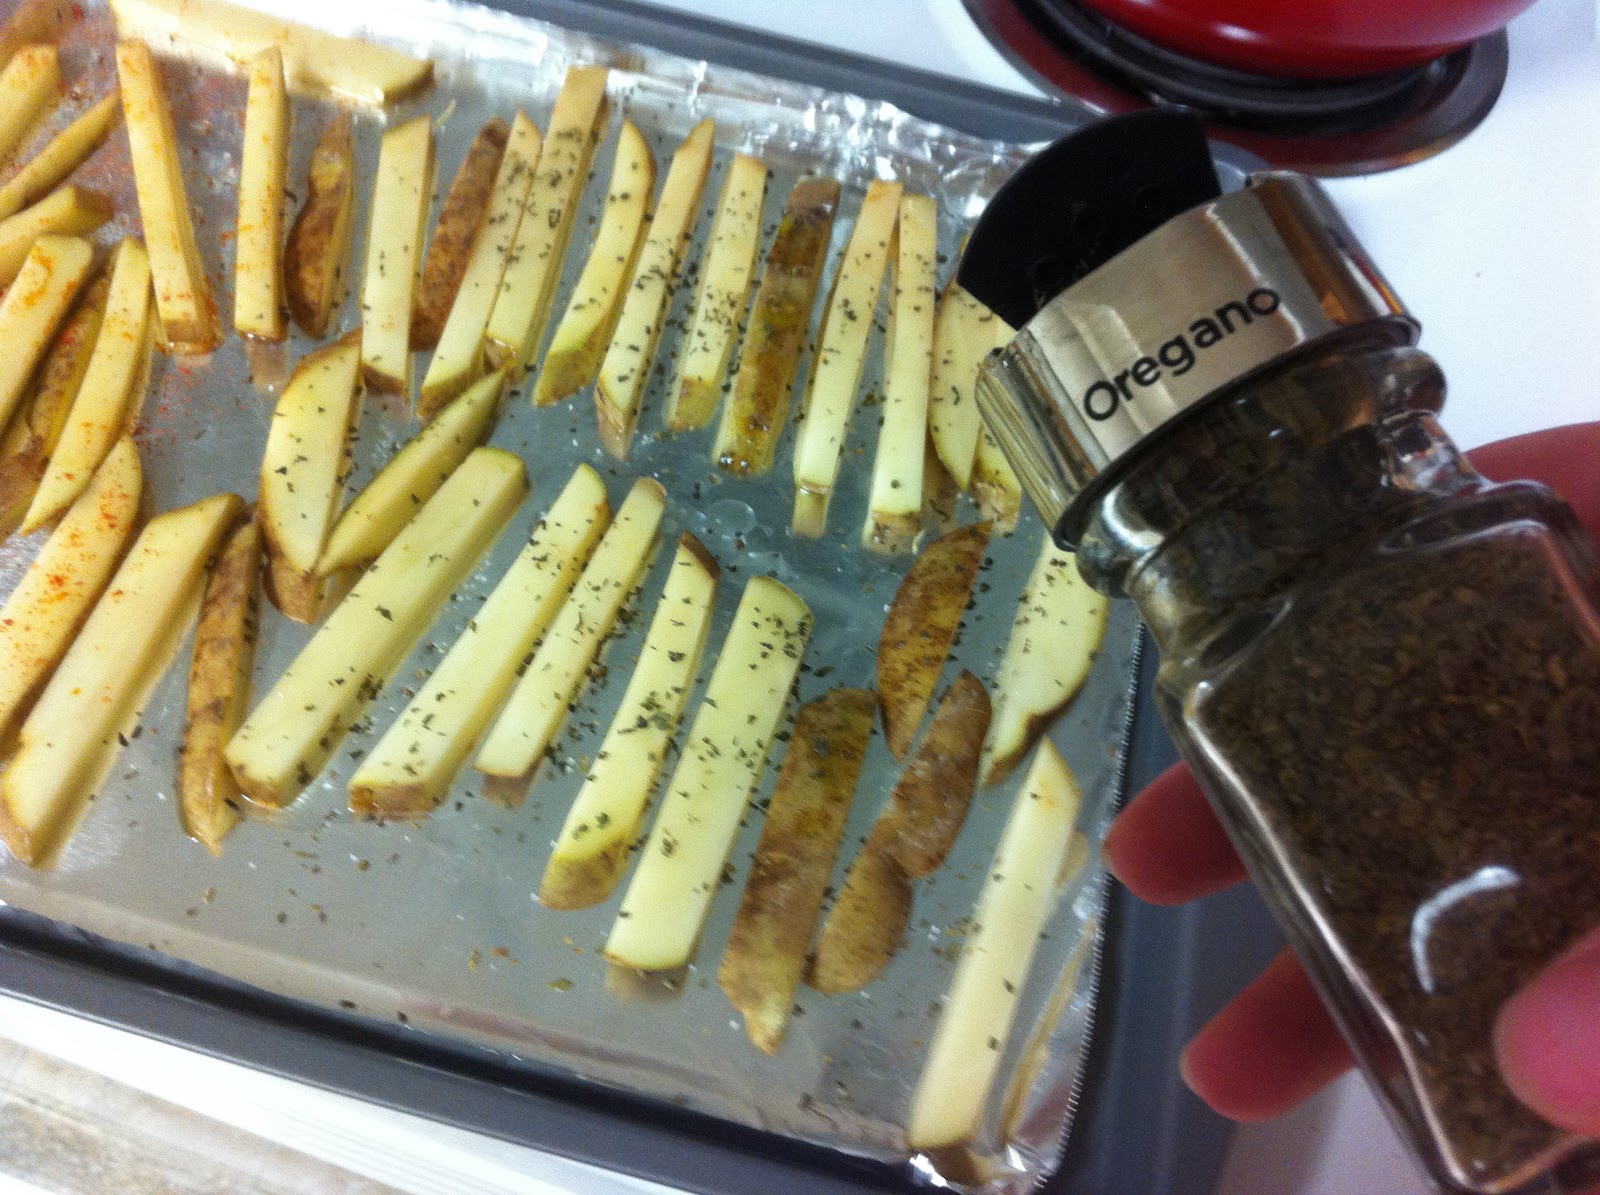
Baked French Fries
2 potatoes
2 Tbs olive oil
1 teaspoon Paprika
1 teaspoon Cheyenne pepper
1 teaspoon Basil
1 teaspoon Oregano
STEP ONE

Preheat oven to 450º
Slice the potatoes long ways, and then slice again into fries.
pour 1 Tbs of Olive oil and spread on the foil over your baking pan

Then spread your unbaked fries on the sheet and coat them in the remaining olive oil
STEP TWO


sprinkle the paprika and cheyenne on half of the fries
STEP THREE


sprinkle the basil and oregano on the other half of the fries (I like variety)
STEP FOUR
Bake for 25 minutes.
Easy, right?? I was amazed.
Now for the best tasting type of fries. EVER. seriously.. compared to the recipe above, these blows it out of the park.
Buffalo Chips
The recipe serves one person... But it's very easily adjustable
One potato
spoonful of spreadable butter
1 Tbsp Frank's Red Hot sauce
1/4 tsp salt
1/4 tsp onion salt
1/4 tsp pepper
1/4 tsp paprika
1 Tbsp Olive Oil
STEP ONE
Slice the potato to make circle fries
Preheat the oven to 450º
STEP TWO
In a bowl, melt the butter and add everything but the olive oil. Mix well.
Pour the olive oil on the foil you wrapped your baking sheet in.
STEP THREE

Coat the potatoes with the sauce and place them on the foil.
Put it in the oven.
STEP FOUR

Bake for 16 minutes. Flip each potato slice, then bake for another 14 minutes. (times are approximate, due to individual ovens.) Make sure you check on them when it gets close to the end of the 30 minutes, you want your potatoes to be lightly crispy, but still have a nice soft potato-y texture in the middle (otherwise you'll have made chips, and they don't always taste great...)
ENJOY!!
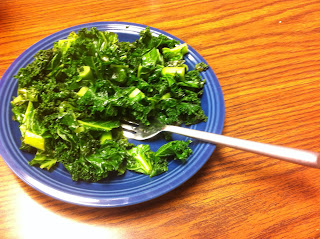
On another note.. because of these crazy delicious and unhealthy cravings, I have resolved with a HUGE plate of garlic sautéed kale. ...Another thing I hated as a child and grown to love. Yum.
Lately I have been craving something fatty and salty and specifically French Fries. Don't ask why... I'm not entirely sure. But last week after work (I'm a nanny!) I drove by about 30 fast food places resisting the urge to stop. Then it finally hit me, I have a 5 pound bag of potatoes at home!
Side note: I went shopping with my roommate and we decided to split the potatoes.. which was a whopping $1.25 each. score.
I've made two types of fries. The French fries that you get from fast food and buffalo chips that you get from Buffalo Wild Wings. Both delicious.
Baked French Fries
2 potatoes
2 Tbs olive oil
1 teaspoon Paprika
1 teaspoon Cheyenne pepper
1 teaspoon Basil
1 teaspoon Oregano
STEP ONE

Preheat oven to 450º
Slice the potatoes long ways, and then slice again into fries.
pour 1 Tbs of Olive oil and spread on the foil over your baking pan

Then spread your unbaked fries on the sheet and coat them in the remaining olive oil
STEP TWO


sprinkle the paprika and cheyenne on half of the fries
STEP THREE

sprinkle the basil and oregano on the other half of the fries (I like variety)
STEP FOUR
Bake for 25 minutes.
Easy, right?? I was amazed.
Now for the best tasting type of fries. EVER. seriously.. compared to the recipe above, these blows it out of the park.
Buffalo Chips
The recipe serves one person... But it's very easily adjustable
One potato
spoonful of spreadable butter
1 Tbsp Frank's Red Hot sauce
1/4 tsp salt
1/4 tsp onion salt
1/4 tsp pepper
1/4 tsp paprika
1 Tbsp Olive Oil
STEP ONE
Slice the potato to make circle fries
Preheat the oven to 450º
STEP TWO
In a bowl, melt the butter and add everything but the olive oil. Mix well.
Pour the olive oil on the foil you wrapped your baking sheet in.
STEP THREE

Coat the potatoes with the sauce and place them on the foil.
Put it in the oven.
STEP FOUR

Bake for 16 minutes. Flip each potato slice, then bake for another 14 minutes. (times are approximate, due to individual ovens.) Make sure you check on them when it gets close to the end of the 30 minutes, you want your potatoes to be lightly crispy, but still have a nice soft potato-y texture in the middle (otherwise you'll have made chips, and they don't always taste great...)
ENJOY!!
On another note.. because of these crazy delicious and unhealthy cravings, I have resolved with a HUGE plate of garlic sautéed kale. ...Another thing I hated as a child and grown to love. Yum.

Monday, January 9, 2012
Lofthouse cookies with Cinnamon Cream Cheese Icing
My guilty pleasure...
 These beautiful cookies are the best tasting, worst for you treat I have ever come across. If I ever see these at a party, I bypass all the deliciously homemade goodies and dive into the mile long ingredient of the most unnatural sugar, fats, and color. They are so bad for your body... But then I stumbled upon the most glorious of recipes. From the kitchen of Mother Thyme, I discovered you can bake these with ingredients that I am familiar with! (none of this Mono- and Diglycerides, Polysorbate 60, Soy Lecithin, and Monocalcium Phosphate...whatever they may be)
So I planned to make these delicious cookies for a party with some friends; our family Friday night, as I
like to call it. It was themed "Settlers of Catan Tournament" so I wanted to turn the cookies into Catan Cookies!
This is what they were supposed to look like

Beautiful, right? ...I never made it this far. I had no food coloring or a cookie cutter (or the patience to mold each one into a hexagon), so I changed the cookie. Make it my own.
Lofthouse Cookies
makes 2 dozen delicious treats

STEP ONE
Gather ingredients:
3 cups flour
3 teaspoons baking powder
1/2 teaspoon salt
1 cup (2 sticks) butter, room temperature
1 cup sugar
2 large eggs
2 tablespoons sour cream
1 teaspoon vanilla
First, combine flour, baking powder, and salt in a medium bowl (or a 4 cup measuring cup for convenience, like me!)
MISTAKES... they happen
Continuing the learning process of Liz in the kitchen, I just realized (3 days later, mind you) that I had used baking soda instead of baking powder. It was an easy mistake considering baking soda is the usual leavening agent you use in cookies, but these cookies were a cakey texture and needed baking powder.
The two are similar in that they cause the baked good to rise, but they produce different tastes and textures.
Baking Soda is a pure sodium bicarbonate and reacts immediately to acidic ingredients (yogurt, buttermilk, honey), causing a release of carbon dioxide which causes baked goods to rise in the oven.
Baking Powder contains sodium bicarbonate along with an acidifying agent (cream of tartar) and a drying agent (starch). It does not need an additional acidifying agent, so it is usually in baked goods (cake and biscuits) along with a neutral ingredients such as milk.
In terms of taste, baking soda will yield a slightly bitter taste unless it has an acidifying agent, whereas baking powder has a neutral taste and doesn't require anything extra. This is where my mistake rose up to say "HELLO." The cookies tasted great, the texture was on, but it had a strange after taste that I couldn't quite place which ultimately resulted in the disposal of any leftovers I had. But the taste wasn't enough for anyone at the party to notice! Thank goodness...
STEP TWO
Cream together the butter and sugar with a hand mixer.
Now if you have a cheap mixer from Walmart, like me, then the first speed will be like a small hurricane in your bowl. Beware sugar-butter, hurricane Beater will destroy you!
STEP THREE
And add the eggs one at a time (at this point I just stopped using the hurricane warning and stuck with a spoon).
Stir in Sour Cream and Vanilla until combined.
STEP FOUR

Add the flour mixture.
It should start to look like this. Sorry you're just now seeing pictures.. I'm still getting the hang of taking photos of every step in baking.
STEP FIVE

Put the dough in the fridge for an hour and prepare to make incredible frosting!
STEP SIX
Cinnamon Cream Cheese Frosting
One pack Cream Cheese
1/4 cup butter
4 cups powdered sugar
1 teaspoon cinnamon
1 teaspoon vanilla extract
Cream together Cream Cheese and Butter, add the 4 cups of powdered sugar. Then add cinnamon and vanilla.


It should be a thicker frosting, you want it to set nicely.
STEP SEVEN
Preheat Oven to 350º

Roll out those cookies and flatten them to about 1/3 of an inch thick. They won't spread too terribly much, but give them a bit more space than I did here and they are sure not to expand into a cookie amoeba.
Bake for 10-12 minutes.

They look about the same color as when I put them in the oven, this is normal. The texture will feel firm and with the potential of crumbles.
Be sure to let them cool before you frost them, otherwise it will melt off into a sad puddle.

And there you have it!! Deliciously homemade Lofthouse cookies that were a big hit at the party!
Note: Don't be dumb and stack the cookies. Try and find a large platter so that they don't stick together and look nice throughout the night.
So I planned to make these delicious cookies for a party with some friends; our family Friday night, as I
like to call it. It was themed "Settlers of Catan Tournament" so I wanted to turn the cookies into Catan Cookies!
This is what they were supposed to look like
Beautiful, right? ...I never made it this far. I had no food coloring or a cookie cutter (or the patience to mold each one into a hexagon), so I changed the cookie. Make it my own.
Lofthouse Cookies
makes 2 dozen delicious treats
STEP ONE
Gather ingredients:
3 cups flour
3 teaspoons baking powder
1/2 teaspoon salt
1 cup (2 sticks) butter, room temperature
1 cup sugar
2 large eggs
2 tablespoons sour cream
1 teaspoon vanilla
First, combine flour, baking powder, and salt in a medium bowl (or a 4 cup measuring cup for convenience, like me!)
MISTAKES... they happen
Continuing the learning process of Liz in the kitchen, I just realized (3 days later, mind you) that I had used baking soda instead of baking powder. It was an easy mistake considering baking soda is the usual leavening agent you use in cookies, but these cookies were a cakey texture and needed baking powder.
The two are similar in that they cause the baked good to rise, but they produce different tastes and textures.
Baking Soda is a pure sodium bicarbonate and reacts immediately to acidic ingredients (yogurt, buttermilk, honey), causing a release of carbon dioxide which causes baked goods to rise in the oven.
Baking Powder contains sodium bicarbonate along with an acidifying agent (cream of tartar) and a drying agent (starch). It does not need an additional acidifying agent, so it is usually in baked goods (cake and biscuits) along with a neutral ingredients such as milk.
In terms of taste, baking soda will yield a slightly bitter taste unless it has an acidifying agent, whereas baking powder has a neutral taste and doesn't require anything extra. This is where my mistake rose up to say "HELLO." The cookies tasted great, the texture was on, but it had a strange after taste that I couldn't quite place which ultimately resulted in the disposal of any leftovers I had. But the taste wasn't enough for anyone at the party to notice! Thank goodness...
STEP TWO
Cream together the butter and sugar with a hand mixer.
Now if you have a cheap mixer from Walmart, like me, then the first speed will be like a small hurricane in your bowl. Beware sugar-butter, hurricane Beater will destroy you!
STEP THREE
And add the eggs one at a time (at this point I just stopped using the hurricane warning and stuck with a spoon).
Stir in Sour Cream and Vanilla until combined.
STEP FOUR
Add the flour mixture.
It should start to look like this. Sorry you're just now seeing pictures.. I'm still getting the hang of taking photos of every step in baking.
STEP FIVE
Put the dough in the fridge for an hour and prepare to make incredible frosting!
STEP SIX
Cinnamon Cream Cheese Frosting
One pack Cream Cheese
1/4 cup butter
4 cups powdered sugar
1 teaspoon cinnamon
1 teaspoon vanilla extract
Cream together Cream Cheese and Butter, add the 4 cups of powdered sugar. Then add cinnamon and vanilla.
It should be a thicker frosting, you want it to set nicely.
STEP SEVEN
Preheat Oven to 350º
Roll out those cookies and flatten them to about 1/3 of an inch thick. They won't spread too terribly much, but give them a bit more space than I did here and they are sure not to expand into a cookie amoeba.
Bake for 10-12 minutes.
They look about the same color as when I put them in the oven, this is normal. The texture will feel firm and with the potential of crumbles.
Be sure to let them cool before you frost them, otherwise it will melt off into a sad puddle.
And there you have it!! Deliciously homemade Lofthouse cookies that were a big hit at the party!
Note: Don't be dumb and stack the cookies. Try and find a large platter so that they don't stick together and look nice throughout the night.
Friday, January 6, 2012
Lentil Stew is good for yew
I don't like lentils. I grew up thinking they were quite icky. But Mom would make them despite my brother's and my complaints and we would have to eat them. Because "they are good for you," Mom would always say.
But how? Lentils gives you protein and cholesterol-lowering soluble fiber, as well as twice as much iron than other legumes. The high fiber content is especially helpful with blood-sugar disorders as it prevents blood sugar levels from rising rapidly after a meal. Lentils also provide good to excellent amounts of six important minerals, two B-vitamins, and protein—all with virtually no fat.
Not only are lentils super good for you, but they're cheap... dirt cheap. Going for about 75 cents per pound, this food has become a staple in my frugal college life. It sure is better than ramen.. In fact! Compared to lentils, Ramen is expensive! But I don't like Ramen anyway... so no skin off my nose.. (or is it back?....that's a weird saying)
So now that I'm not a picky child anymore and I'm seeking a cheap and healthy lifestyle, I'm giving lentils another shot. In fact, I'm going to make them DELICIOUS. Something that I'm not sure my mom has conquered... Sorry Momma...
Lentil Stew
makes about 10 human sized bowls
STEP 1

Add 3 cups of lentils to a pot and let it soak in water and about a Tablespoon of Cider Vinegar (I used lemon juice) for 4 hours or over night. Make sure you measure the lentils and don't assume the bag that the lentils come in says 3 cups.. when it, in fact, says 3lbs...

You don't have to measure the water, just make sure the water covers the lentils entirely. When you're sick of waiting for them to soak, drain and rinse them. I used lemon juice because lentils are best prepared by soaking them in a slightly acidic solution prior to cooking them. This ensures that they are better able to digest.
STEP 2
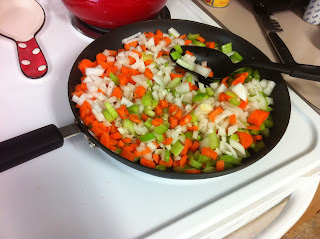
Saute veggies in some olive oil. This pan is filled up with about 5 carrots, 5 stalks of celery, and half an onion. Chopped up. The recipe I was following (loosely) called for a whole onion, but my eyes were screaming after only half so I figured it was enough. Have you ever heard eyes scream?
Sprinkle some oregano on that! (approx. 2 tsp)
I also chopped up some bacon and threw it in with all that. It was fully cooked and all I had in the fridge, I only used about 8 slices. If I had splurged at the grocery, I would've used a pound of raw bacon, fried it and then sautéed the veggies in the bacon grease (yum!). But I was still able to taste the bacon in the end product and it tasted amazing.
STEP 3
 DUMP IT IN DA POT
Yes. all the lentils, veggies, and as much bacon as your heart desired. Then pour 2 quarts of chicken or beef broth over it. Again, I didn't read the recipe very closely before I went shopping and didn't buy 2 quarts of chicken broth. I used 1 quart chicken, 1 quart vegetable broth. Again, still tasted amazing.
STEP 4
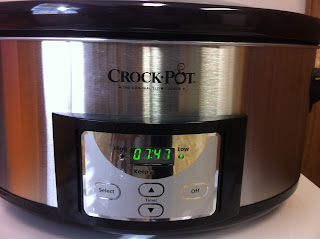
You're going to be pot crocking for 8-12 hours. I set mine for 8 hours (and took the picture 13 minutes later, yay math!) so that it would be done around 5pm, just after my last class of the day.
STEP 5
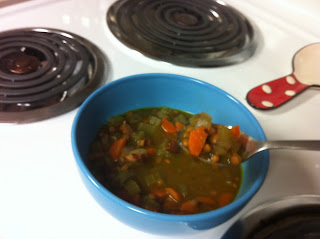
Heap into a human sized bowl and EAT!!
In the beginning of this post, I mentioned that I didn't like lentils. I take it back. Lentils are delicious. You just gotta know the right stuff to cover up the lentily taste and bring out the savory, wholesome, filling greatness that it knows it can be.
The price of this entire dish came to about $0.80-$1.20 a bowl. That's what I call a good college meal.
But how? Lentils gives you protein and cholesterol-lowering soluble fiber, as well as twice as much iron than other legumes. The high fiber content is especially helpful with blood-sugar disorders as it prevents blood sugar levels from rising rapidly after a meal. Lentils also provide good to excellent amounts of six important minerals, two B-vitamins, and protein—all with virtually no fat.
Not only are lentils super good for you, but they're cheap... dirt cheap. Going for about 75 cents per pound, this food has become a staple in my frugal college life. It sure is better than ramen.. In fact! Compared to lentils, Ramen is expensive! But I don't like Ramen anyway... so no skin off my nose.. (or is it back?....that's a weird saying)
So now that I'm not a picky child anymore and I'm seeking a cheap and healthy lifestyle, I'm giving lentils another shot. In fact, I'm going to make them DELICIOUS. Something that I'm not sure my mom has conquered... Sorry Momma...
Lentil Stew
makes about 10 human sized bowls
STEP 1

Add 3 cups of lentils to a pot and let it soak in water and about a Tablespoon of Cider Vinegar (I used lemon juice) for 4 hours or over night. Make sure you measure the lentils and don't assume the bag that the lentils come in says 3 cups.. when it, in fact, says 3lbs...
You don't have to measure the water, just make sure the water covers the lentils entirely. When you're sick of waiting for them to soak, drain and rinse them. I used lemon juice because lentils are best prepared by soaking them in a slightly acidic solution prior to cooking them. This ensures that they are better able to digest.
STEP 2
Saute veggies in some olive oil. This pan is filled up with about 5 carrots, 5 stalks of celery, and half an onion. Chopped up. The recipe I was following (loosely) called for a whole onion, but my eyes were screaming after only half so I figured it was enough. Have you ever heard eyes scream?
Sprinkle some oregano on that! (approx. 2 tsp)
I also chopped up some bacon and threw it in with all that. It was fully cooked and all I had in the fridge, I only used about 8 slices. If I had splurged at the grocery, I would've used a pound of raw bacon, fried it and then sautéed the veggies in the bacon grease (yum!). But I was still able to taste the bacon in the end product and it tasted amazing.
STEP 3

Yes. all the lentils, veggies, and as much bacon as your heart desired. Then pour 2 quarts of chicken or beef broth over it. Again, I didn't read the recipe very closely before I went shopping and didn't buy 2 quarts of chicken broth. I used 1 quart chicken, 1 quart vegetable broth. Again, still tasted amazing.
STEP 4
You're going to be pot crocking for 8-12 hours. I set mine for 8 hours (and took the picture 13 minutes later, yay math!) so that it would be done around 5pm, just after my last class of the day.
STEP 5
Heap into a human sized bowl and EAT!!
In the beginning of this post, I mentioned that I didn't like lentils. I take it back. Lentils are delicious. You just gotta know the right stuff to cover up the lentily taste and bring out the savory, wholesome, filling greatness that it knows it can be.
The price of this entire dish came to about $0.80-$1.20 a bowl. That's what I call a good college meal.
Subscribe to:
Posts (Atom)